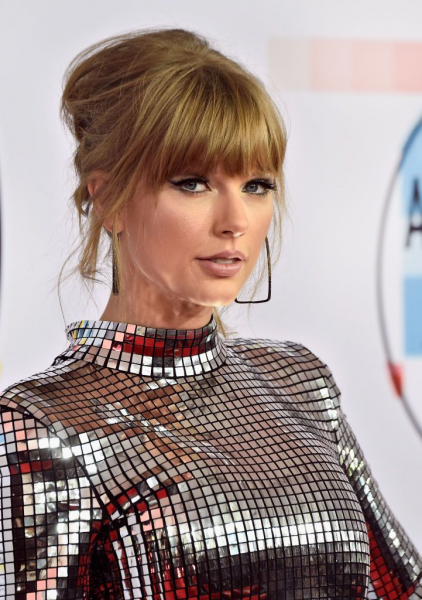
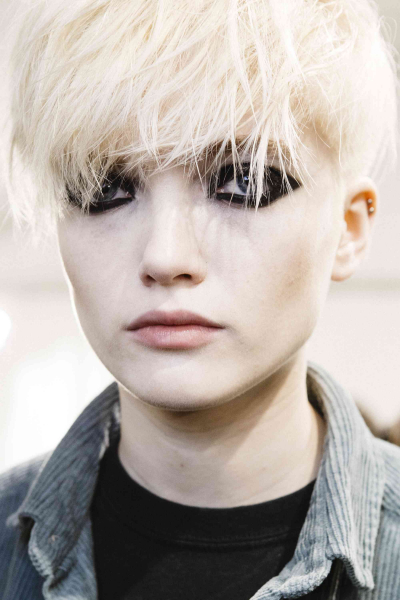
We're calling it now: The days of long, fussy hair extensions are over. Now, it's all about the messy, low-maintenance chop. In particular, pixie cuts with layers and complexities are perfect for effortless, post-quarantine style. But are you ready to make the cut?
“Be honest with yourself and your stylist,” says Adrianne Johnson, stylist at Maxine Salon in Chicago. “Is this a look you can commit to? Is it the right fit for your hair type and your lifestyle?”
If you're ready for something manageable, easy-to-style, and towel-dry chic, look no further. The following long and effortless (and in some cases, iconic) pixie cuts only look fussy.
01 of 50
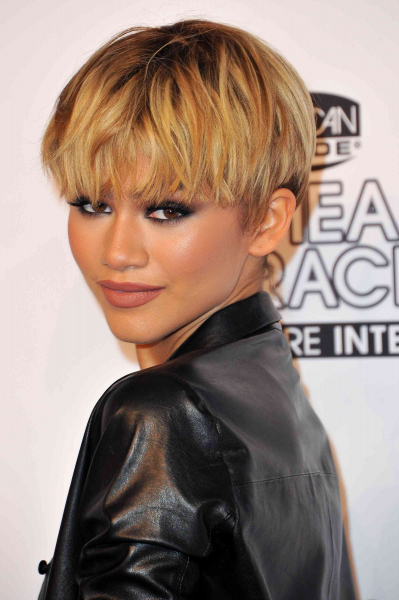
Zendaya
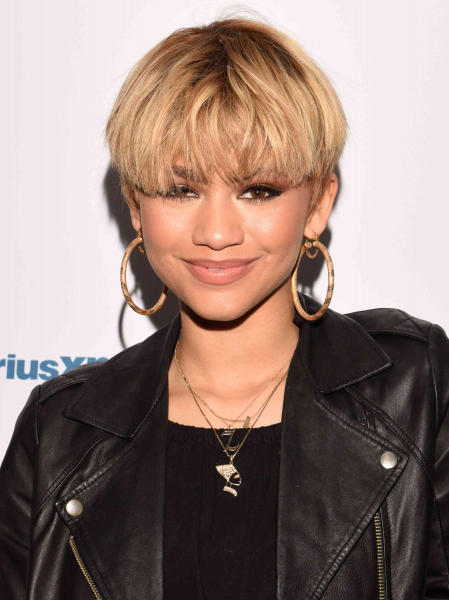
Out of all the red-carpet hairstyles Zendaya has sported over the years, it's difficult to choose a favorite. But we think her dirty-blonde pixie cut is criminally underrated. With tousled long bangs and dimensional color, this 'do is effortless perfection (perhaps Rue in Euphoria will wear a similar look next season).
02 of 50
Joey King
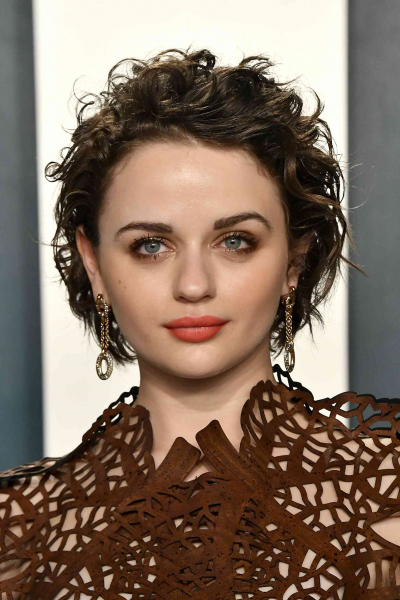
Actress Joey King may have shaved her head for her role in The Act, but she’s always managed to style it gracefully, no matter how awkward in-between growth can be. Here, she’s wearing layered, bouncy curls that are easy to style with a small curling iron. The key is not trying to achieve perfection with each curl and rather allowing them to vary in shape and direction.
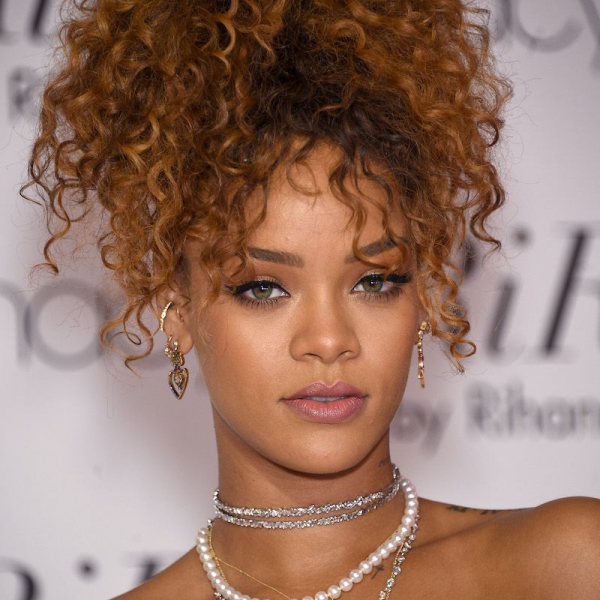
03 of 50
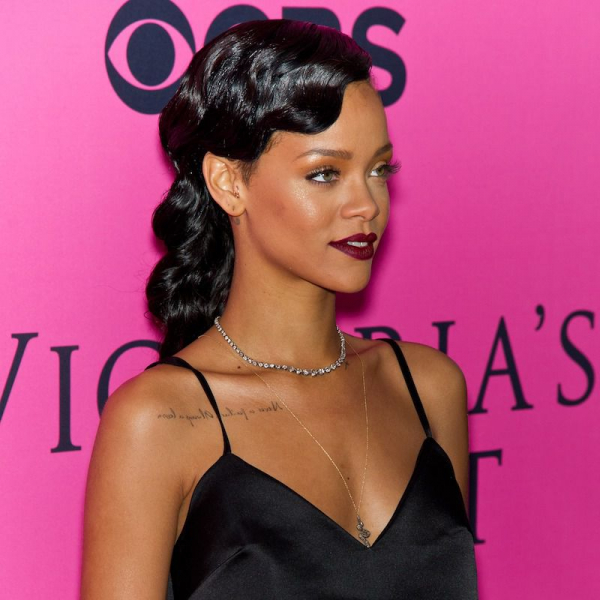
Rihanna
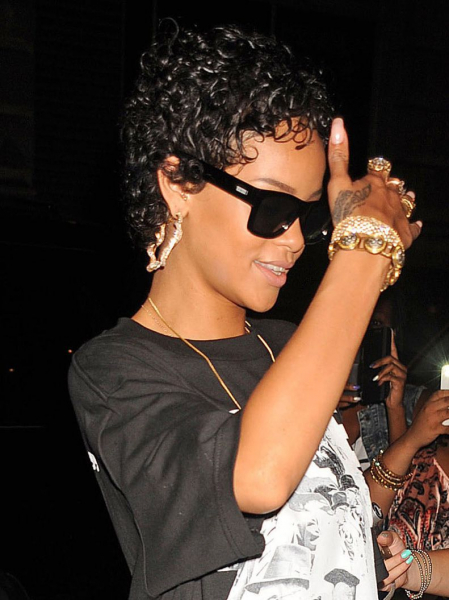
Of course, Rihanna can do no wrong, and it's hard to choose from her iconic pixie-cut phase. But there's something about her naturally curly, tousled cut here that makes us feel nostalgic for her Diamonds era—maybe it's the wet-look curls or the statement jewelry. Either way, it's a favorite in our book.
04 of 50
Kate Moss
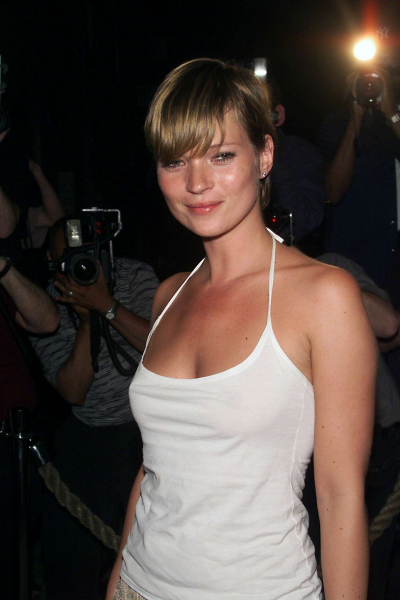
In case vintage supermodel vibes are your thing, we can’t help but swoon over Kate Moss’s long-pixie-cut-with-sideswept-bangs phase. Get the model-off-duty look with nothing but some smoothing serum and a hair straightener.
05 of 50
Tavi Gevinson
Writer and cool-girl Tavi Gevinson shows us how low-effort is done. She still looks chic and put-together with her long pixie pieces slicked back and pulled behind the ears. Combine that with a fresh face and bold, bright lip, and we can’t help but admire how majorly this look was achieved with (probably) minimal effort.
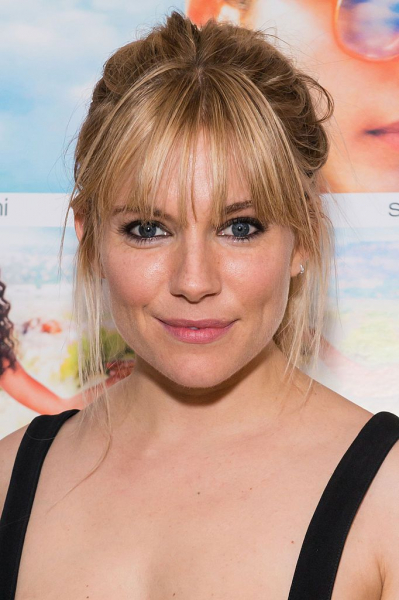
06 of 50
Sienna Miller
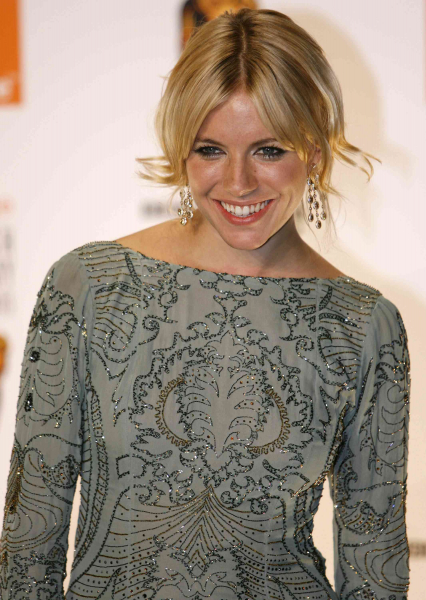
Model and actress Sienna Miller has long-perfected the effortless cool-girl aesthetic. But nothing encapsulates that vibe quite like a good haircut—and although Miller's been rocking different versions of pixie cuts for years, we're quite fond of this 'do in particular. All you need to do is middle-part your long pixie cut, and flip out the ends to your liking.
07 of 50
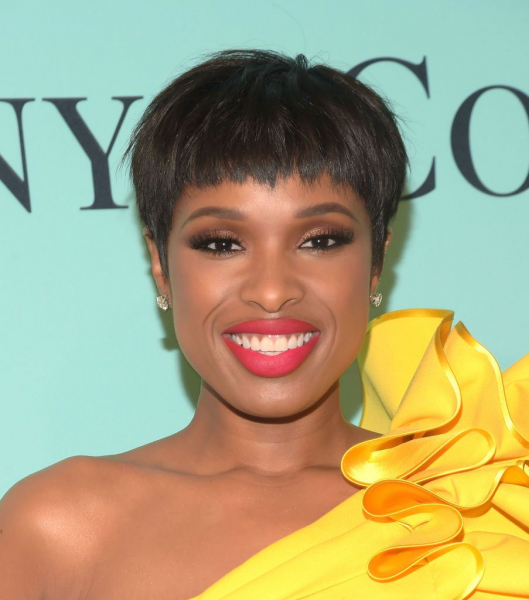
Jennifer Hudson
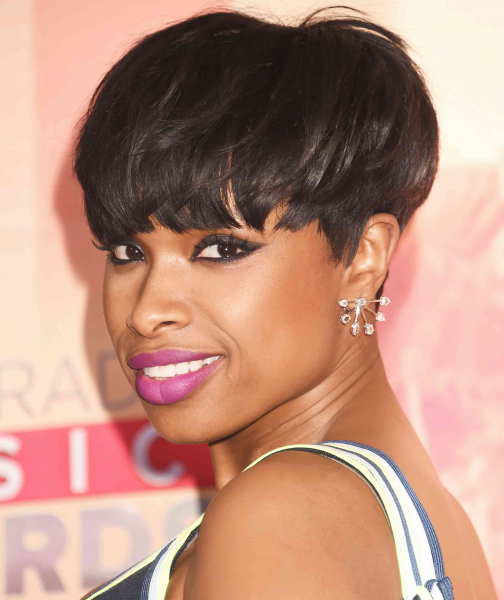
"And you, you're gonna love me." Jennifer Hudson was right if she was talking about this hairstyle on her—because we're obsessed. The face-framing bangs combined with volume on top makes for a fun, versatile, and easy-to-style cut.
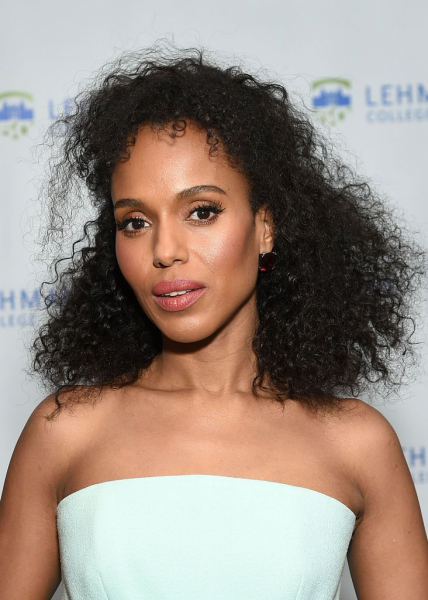
08 of 50
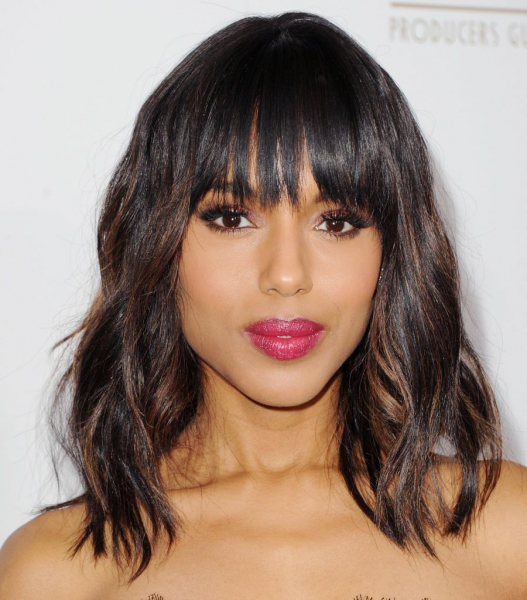
Kerry Washington
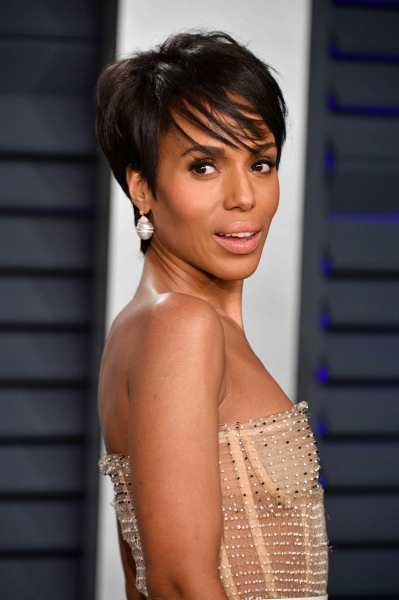
To get Kerry Washington’s piece-y, side-swept bangs, all you need to do is take a pinch of texturizing cream (like Oribe Matte Waves Lotion) on your fingertips to piece out your bangs and accentuate the tousled texture. “It makes you look like you just happen to have great hair without trying,” says Johnson. “It’s not fussy.”
09 of 50
Agyness Deyn
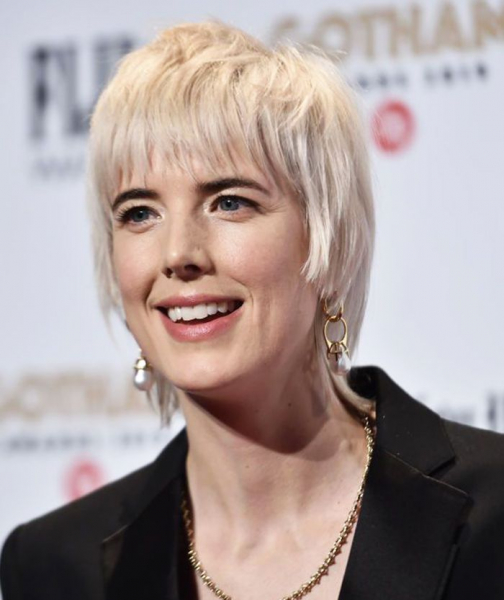
Model Agyness Deyn has never strayed away from a fun beauty moment. This shag-like cut is reminiscent of retro vibes and rock-and-roll—and we're obsessed. Get the look with straight-across bangs, longer face-framing pieces, and a shaggy chop.
10 of 50
Rowan Blanchard
Actress Rowan Blanchard pulls off the whimsical, shag-like pixie cut perfectly—and so could you! “As long as your hair has texture and isn’t too fine, it’s super fun and flirty,” says Johnson. “You need some density to make it work, and the right products to get that effortless vibe.”
11 of 50
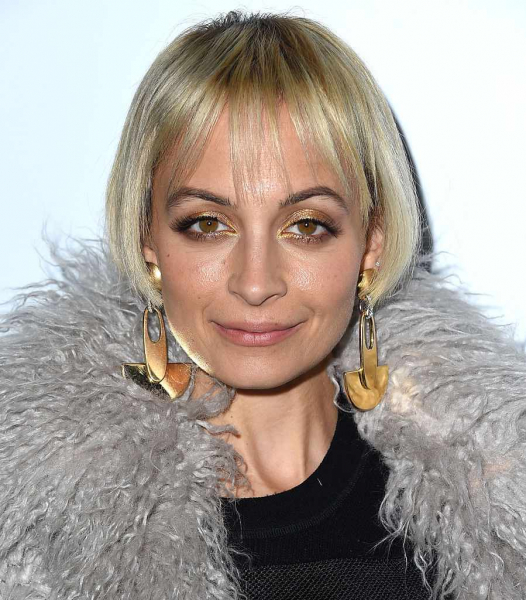
Nicole Richie
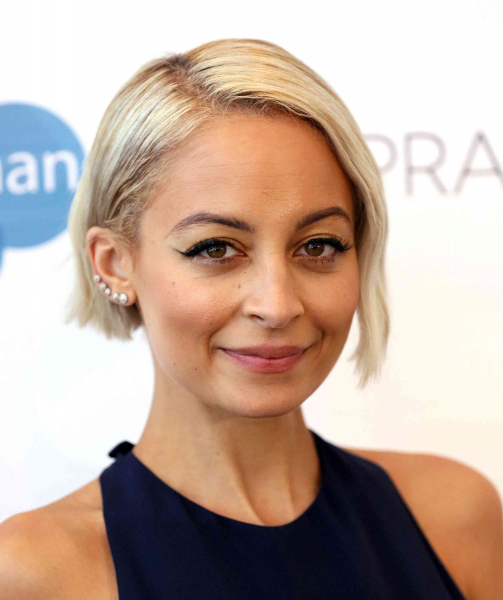
We love those who play by their own rules—and experimenting style-wise has always been Nicole Richie's M.O. If you have naturally fine, wavy hair, make the chop like Richie and pair a short, behind-the-ears style with longer, sideswept fringe in front. Chic, simple, and low-effort.
12 of 50
Linda Evangelista
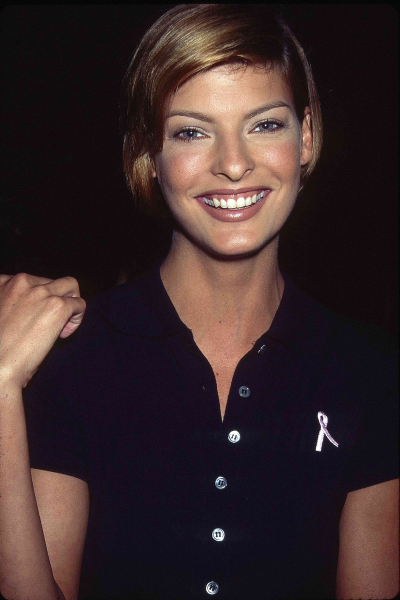
We're still taking beauty inspo from our favorite '90s supermodels—because, the looks are proving to be timeless. Linda Evangelista's sweet pixie cut is perfect for 2020 and beyond.
13 of 50
Maria Borges
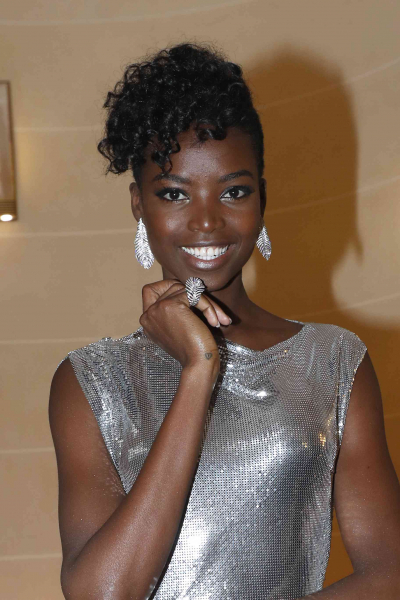
With short sides and longer pieces on top, get ready for endless styling possibilities. Model Maria Borges shows us how it's done with voluminous ringlets on top, piled asymmetrically. It might look ultra-polished and glam, but with the right cut, you'll be able to style your hair like this instantly.
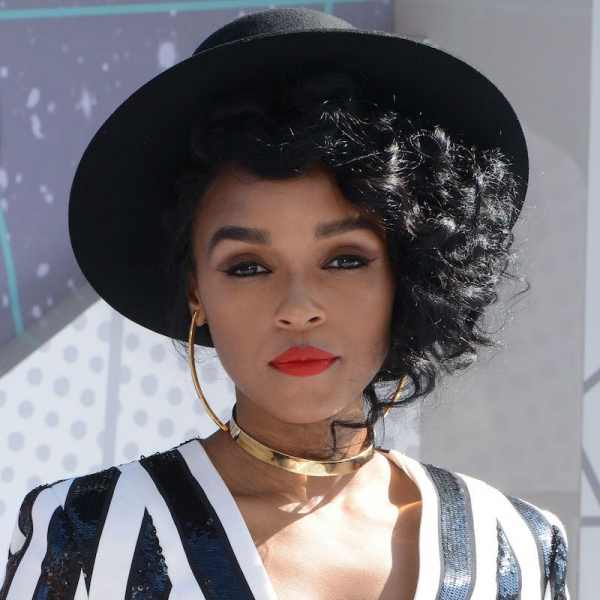
14 of 50
Janelle Monae

Janelle Monae is a certified beauty risk-taker, but we love the classic vibes here. “I love my natural hair,” she told us in 2016. “You can straighten it, curl it, play with different shapes and textures.” With a chin-grazing length and a side-part, you’d never guess that the singer usually goes for more whimsical beauty looks on the red carpet, and we love the versatility.
15 of 50
Anne Hathaway

Want a secret styling hack from the pixie-cut pros, like Anne Hathaway? Simply twist your face-framing pieces and pull them back to look like you're wearing an elaborate updo. No matter how you style a long pixie cut, finding the right products is important. "You just have to keep it simple and use the right products, and apply and reapply them when you need to," Johnson says.
16 of 50
Ruth Bell
Model Ruth Bell has long leaned into androgynous looks, and has played around with a multitude of short hairstyles in the past (including a knockout buzzcut). But we love the look of fringey, face-framing bangs here that look like they could’ve simply been tousled after jumping out of the shower. (And this platinum hair color is the icing on top.)
17 of 50
Julianne Hough
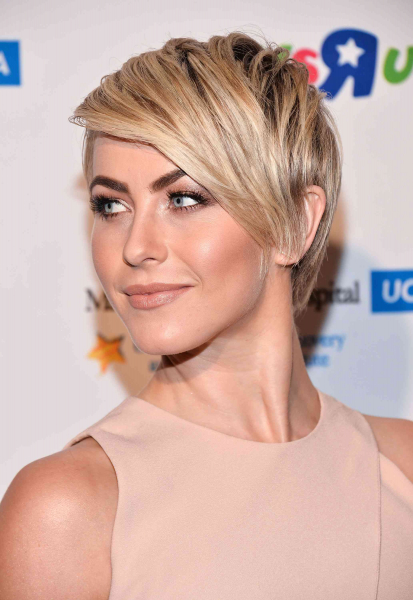
With this style, Julianne Hough further dispels the notion that pixie cuts can't be sexy. Of course, sideswept bangs and a perfect, multidimensional blonde hue don't hurt—but the key to a gorgeous, sultry long pixie like this is subtle layers and hidden, boosted volume.
18 of 50
Winona Ryder
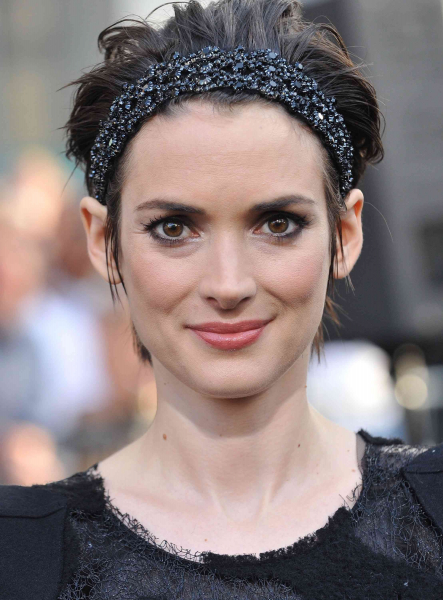
Winona Ryder has experimented with short ‘dos in the past, and we love how this sweet style suits her. Use this as inspiration if you wake up one morning and suddenly hate the idea of doing your hair—simply push in a statement-making headband and call it a day.
19 of 50
Lily Collins
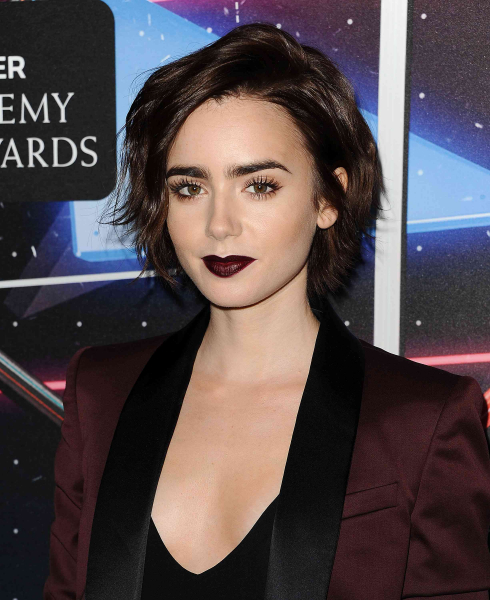
Lily Collins is a hair chameleon, and we can't help but fall for this particular piece-y 'do. Chin-length layers have never looked this chic. (And bonus: This is a great look to use for inspiration if you're currently in that in-between stage of "not a pixie, not yet a bob.")
20 of 50
Maggie Gyllenhaal

Maggie Gyllenhaal has worn pixie cuts at varying lengths over the years, but we're obsessed with this side-swept version. It's slightly longer than what the actress usually goes for, and with straightened locks (instead of her signature curly or wavy regimen), it's a refreshingly chic change of pace.
21 of 50
Ruby Rose
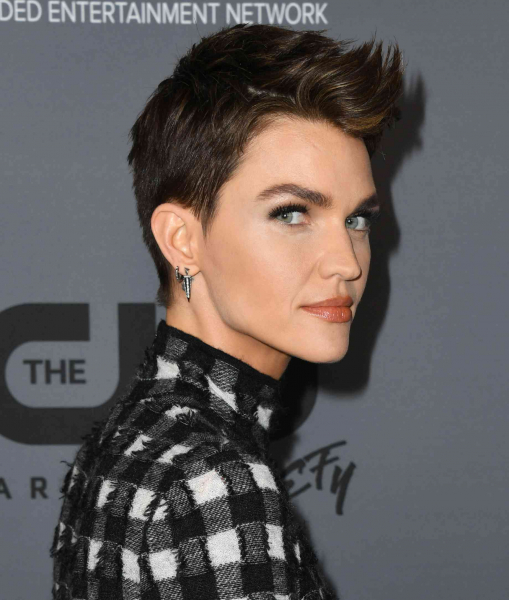
It’s not a stretch to say Ruby Rose’s piece-y pixie cut has become her signature look. In particular, her long-pieces-on-top (with voluminous spikes) and short, polished sides have become a red-carpet staple for the actress. Get the look yourself with styling gel and a great round brush.
22 of 50
Meg Ryan
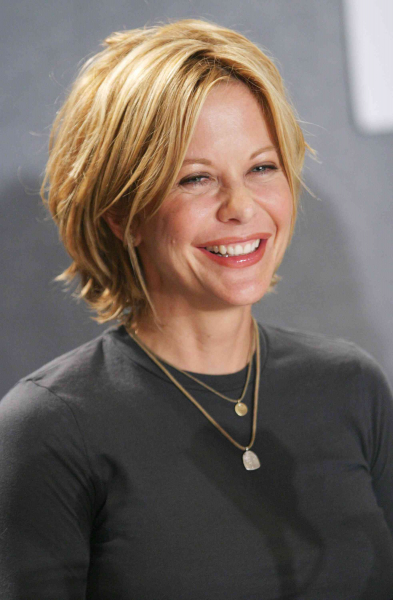
America's Sweetheart has given us hair-spiration for years. She may be most well-known for her blonde curls, but we love Meg Ryan's short, sleek, and straight look here (even if we miss the curls just a little bit). Get the look with face-framing layers that you, too, can probably wear straight out of bed in the morning.
23 of 50
Natalie Portman
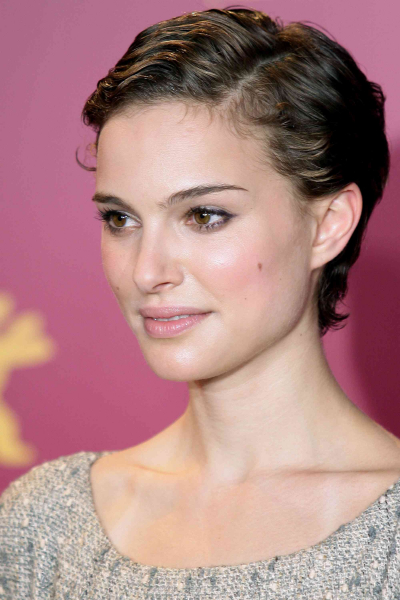
Natalie Portman pulls the wet look off perfectly. Although the Oscar-winning actress has graduated to more grown-up styles these days, we can’t help but admire her sleek, long pixie cut days. (Try using a bit of hair oil to recreate your own version.)
24 of 50
Kristen Stewart
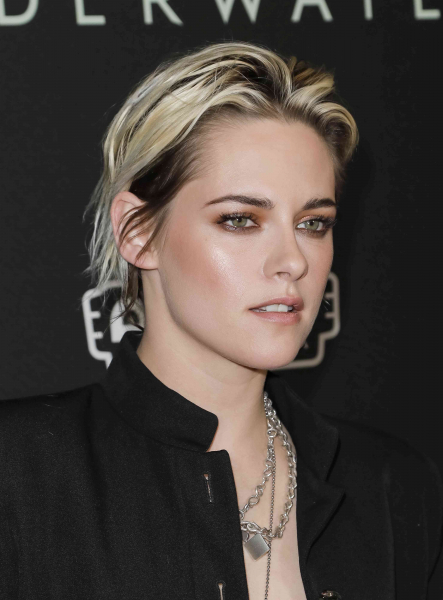
Kristen Stewart has experimented with hairstyles throughout her career, but nothing suits her quite as perfectly as a tousled, long pixie cut. (Probably because we know the actress has literally shaved her head before to avoid the fuss of hairstyling.) The contrasting colors at play just add to the fun.
25 of 50
Evan Rachel Wood
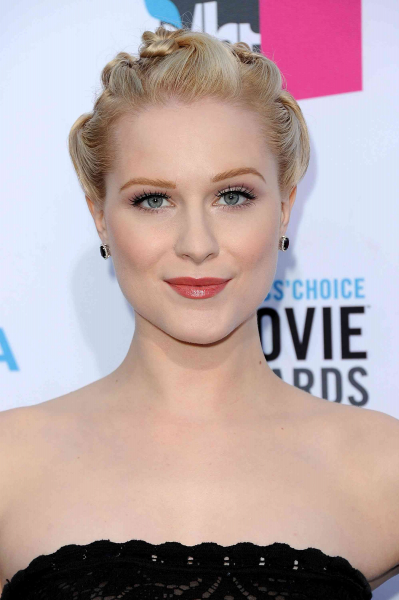
Elevate a simple pixie cut like actress Evan Rachel Wood. Pull some small, individual pieces back, twist, brand, and clip them so it looks like you're hiding an elegant updo under your layers. You'll look red-carpet-ready in under five minutes.
26 of 50
Robin Wright
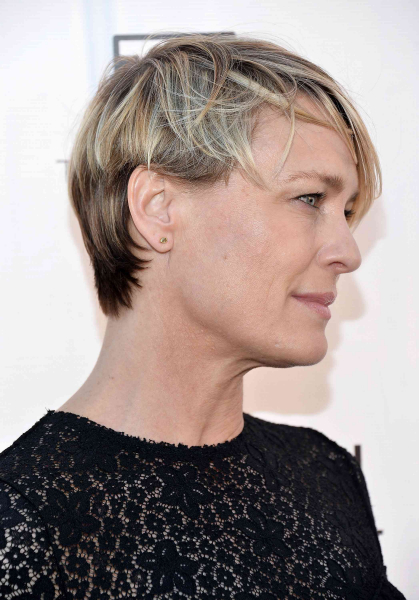
Robin Wright's been wearing her iconic blonde hair on the red carpet for decades, but there's something about her long pixie cut here that we simply can't get enough of. Maybe it's the dimension of the highlights and length on top, and the piece-y, tousled pieces that make it approachable and chic at the same time. Either way, we're Robin Wright stans forever more.
27 of 50
Karen Gillan
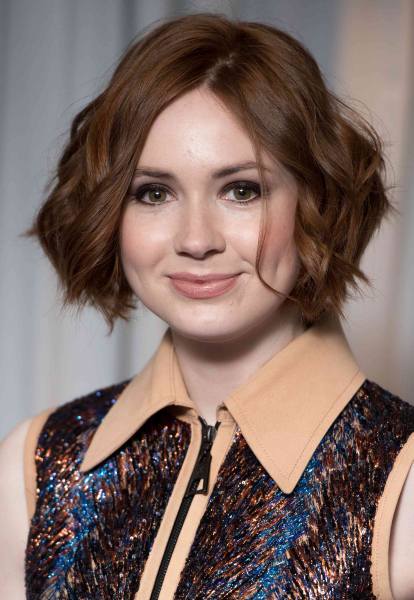
Besides her topnotch acting chops, Karen Gillan is usually known for her long, gorgeous auburn tresses. But the Dr. Who actress has also sported short, messy styles in the past too—and we love this chin-length 'do that still feels consistent to her usual aesthetic (tousled beach waves).
28 of 50
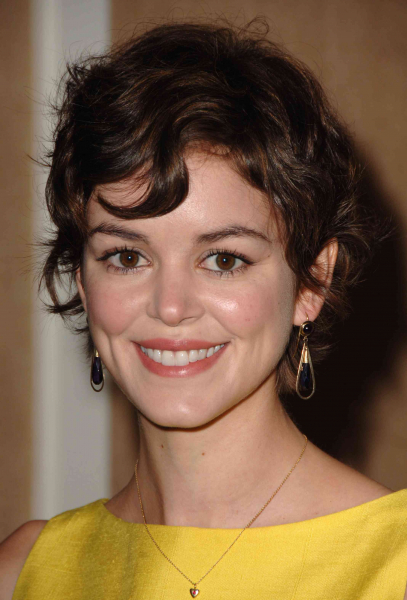
Audrey Tautou
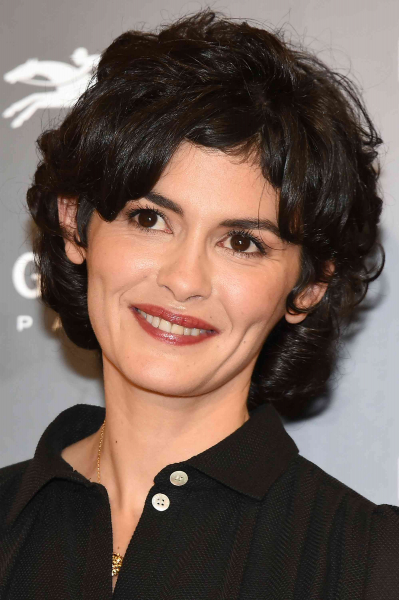
Actress Audrey Tautou epitomizes the fuss-free vibe of French style, and her signature tousled locks are no different. Here, she rocks a pixie cut with bouncy waves. This length is perfect for amping up the volume, especially with a naturally wavy texture like Tautou's.
29 of 50
Michelle Williams
Queen of pixie cuts, Michelle Williams' piecey, messy pixie cut here is a great example of what to do with naturally fine hair. The layers, side bangs, and color give her dimension, and the cut itself allows for low-maintenance, easy-to-style perfection.
30 of 50
Rita Ora
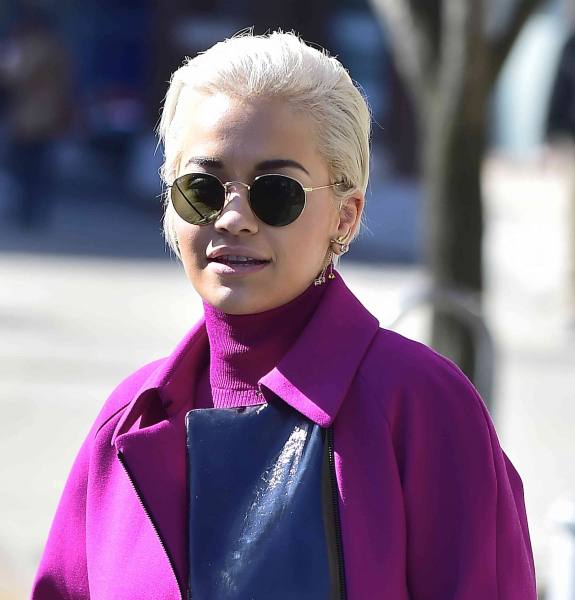
Rita Ora's different hairstyles and colors run the gamut, but we can't help but admire her platinum pixie phase. A foolproof way of styling it is simply to slick it back while wet, like Ora does here. (It'll only look like it took you forever to style it.)
31 of 50
Tyra Banks
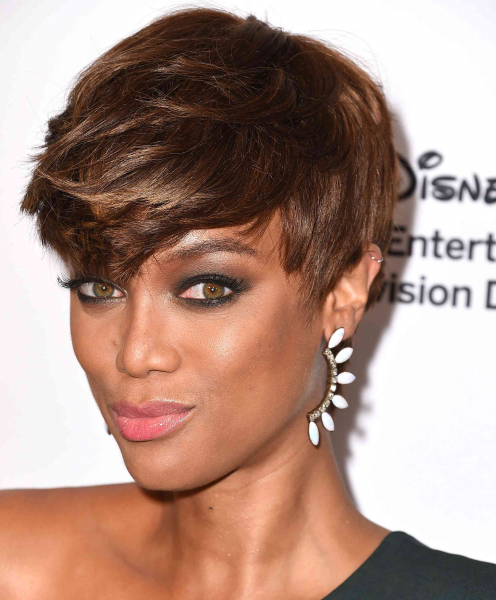
Smize your way into a new hair regimen. With long, layered pieces on top, Tyra Banks' long pixie cut has a ton of versatility. Style it straight, wavy, wispy, and beyond.
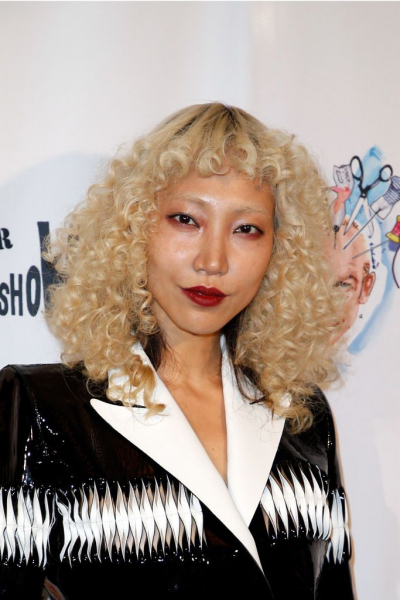
32 of 50
Ai Tominaga
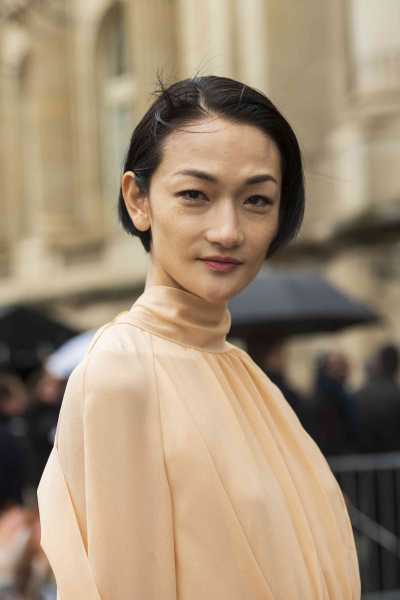
Model Ai Tominaga's subtle layers give her look a polished feel, but it definitely has an edge. With tousled pieces and easy layers, you can get a similarly low-maintenance look. (Just make sure your hair texture is right for the cut.)
33 of 50
Keira Knightley
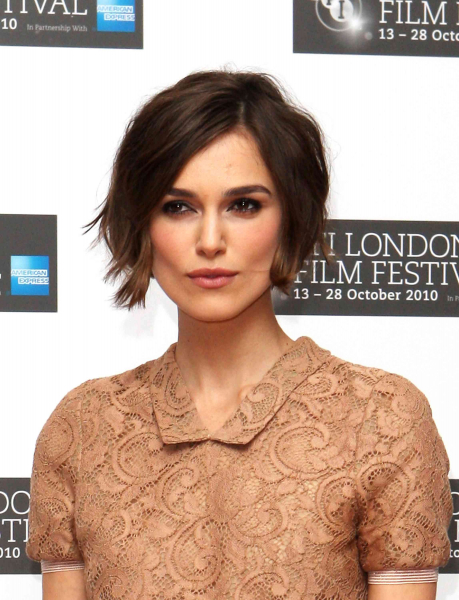
Keira Knightley is one of our favorite Hollywood style-and-beauty chameleons, but her retro long pixie cut here is particularly inspired. Get a similar chin-length chop and wear it with touchable beach waves too. It has a retro, vintage vibe but still feels completely of-the-moment.
34 of 50
Katie Holmes
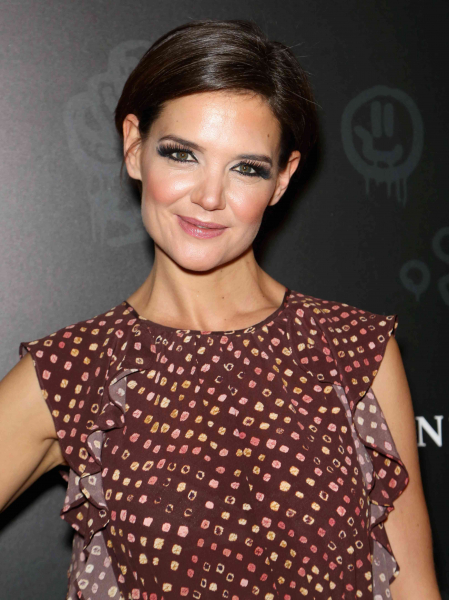
For a few years in the early-aughts, Katie Holmes was the reigning pixie-cut princess. We love her with any hairstyle, to be clear, but there's something ultra-chic and sweet about this sleek, chin-length pixie cut. (It's long enough to wear behind the ears, short enough to style in under five minutes.)
35 of 50
Victoria Beckham
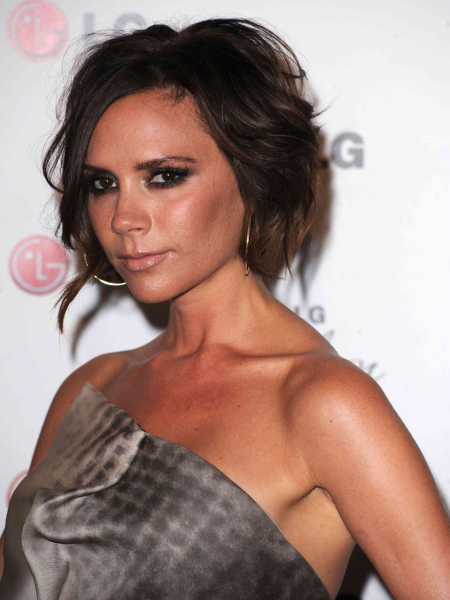
Multi-hyphenate Victoria Beckham can do no wrong, and that goes for her choice of hairstyles too. She’s had varying degrees of long pixies and short pixies, but the spike-y style here is one of her most iconic. All you need is a good styling wax to get the look yourself.
36 of 50
Jennifer Lawrence
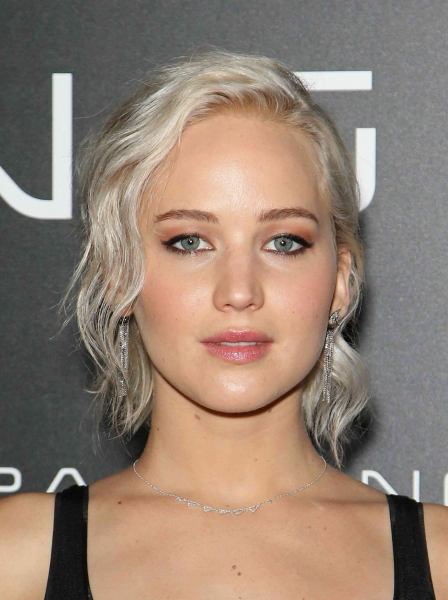
Jennifer Lawrence has slayed the long pixie cut for years, and although this 'do is on the longer side for what she's done in the past, we love the way she styles the tousled, short tendrils. If you have naturally wavy hair too, let your long pixie cut loose like Lawrence.
37 of 50
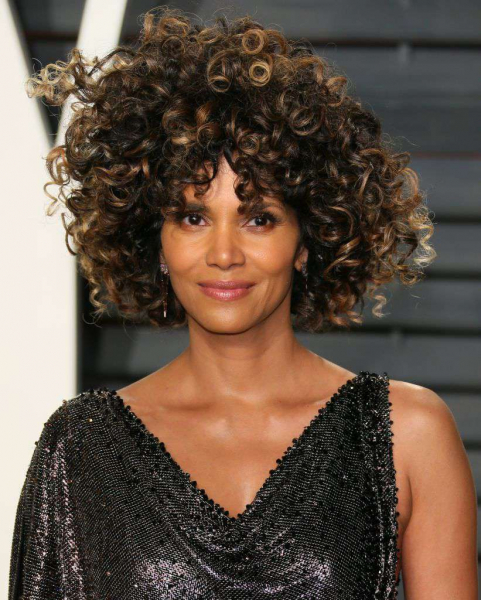
Halle Berry
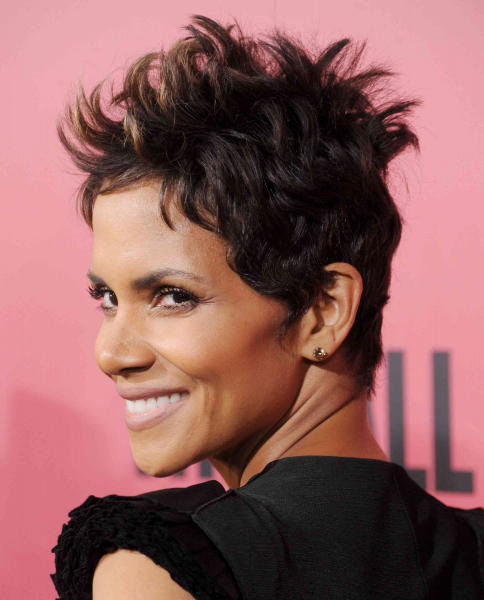
We can all thank Halle Berry for putting the “sexy pixie cut” on the map. (Seriously—when was the pixie cut ever associated with James Bond films before her?) In any case, one of Berry’s signature, spiky looks is fun, flirty, and easy to achieve with a good styling mousse.
38 of 50
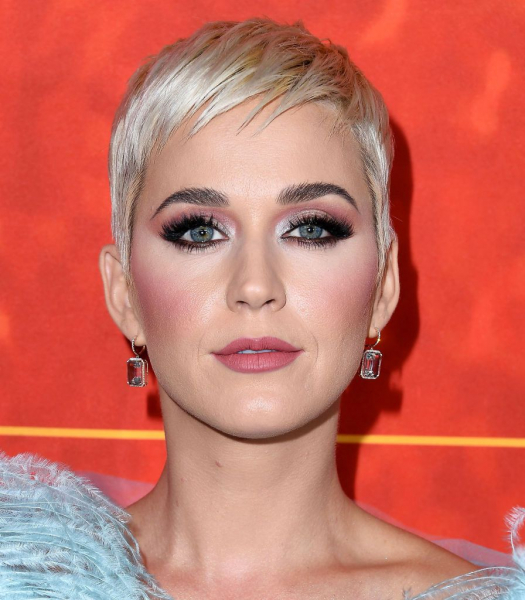
Katy Perry
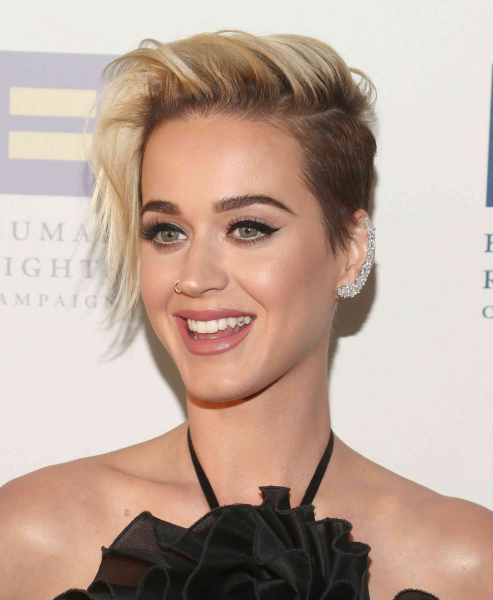
With shorter hair on the sides and longer hair on the top, Katy Perry's undercut is top-notch and versatile. "You can play up both sides, collapse the hair on it, or show the undercut and own the edginess," Johnson says. "It can be high-fashion and punk, all at once."
39 of 50
Danai Gurira
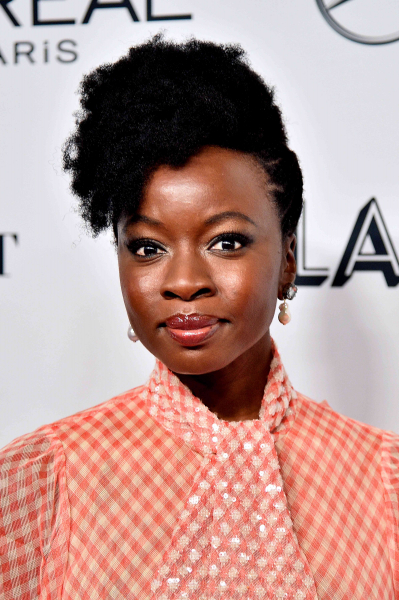
Actress Danai Gurira has a gorgeous asymmetrical moment here, with long pieces on top collapsing over to frame her face. Got volume like this? You'll give your hair extra bounce by cutting it shorter. Plus, the styling possibilities are endless.
40 of 50
Carey Mulligan
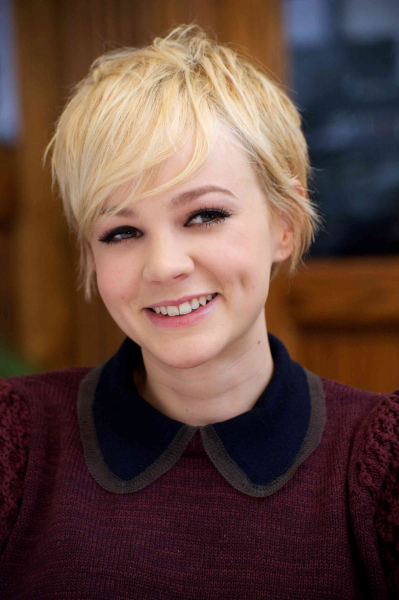
Carey Mulligan has sported pixie cuts before pixie cuts were cool. Of course, it's hard to pick a favorite style of hers, but we love this long, blonde piecey moment. If you have fine hair, you can give the illusion of volume too, with strategically placed layers and styled bangs.
41 of 50
Kate Mara
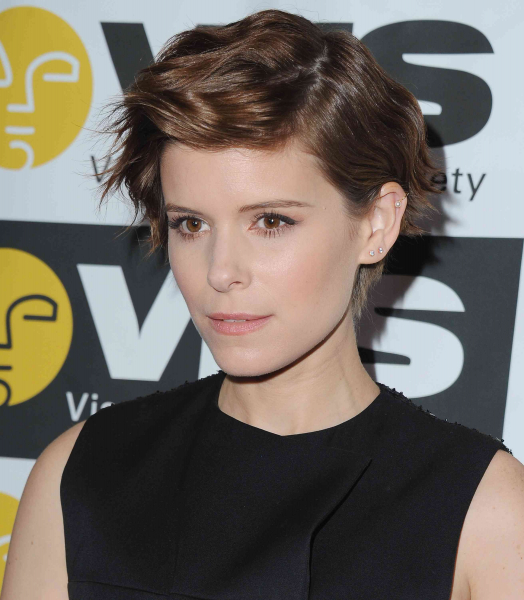
Actress Kate Mara gives us messy, tousled perfection without looking frizzy. The key is getting a lightweight working spray (like Kérastase Laque Dantelle) to smooth flyaways and layers. “Whether your hair is freshly washed or it’s been a few days,” says Johnson, “you should definitely use a spray to prep and finish hair for hot tool use, like when you use a curling iron.”
42 of 50
Tilda Swinton
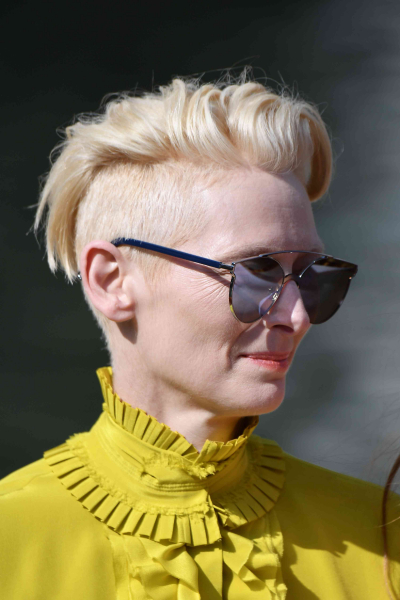
Actress Tilda Swinton enlisted the half-buzz here, and we're kind of obsessed. Also referred to as an undercut, Tilda's shaven side could be easily concealed with her longer, messy layers, or shown off like so. The versatility is what makes this style even more alluring.
43 of 50
Coco Rocha

Although Coco Rocha's hair may be naturally fine, the strategic layers of her blonde pixie add volume and movement. "Layers create lift," says Johnson. "So although you might have less hair density, finding the right balance for your hair type is the most important thing." Clearly, layering short hair pays off when it's done right.
44 of 50
Haley Bennett
Turn your natural waves into something a little more glam, à la actress Haley Bennett. How to get the retro look, you ask? It's easy: While your hair is wet, brush a heavy mousse through it, and use hairpins where you want your curl to be—and don't remove them until the minute before you walk out the door for ultimate oomph.
45 of 50
Drew Barrymore
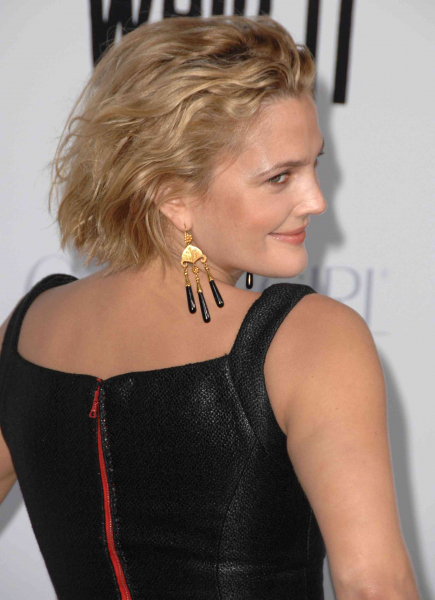
Drew Barrymore is a beauty aficionado in her own right—and she shows how a wavy short ‘do is done. And good news for those of us growing out pixie cuts as we speak: No matter what stage of the growing-out process you’re in, you’ll be golden if you simply tousle your waves with some styling serum to get the look.
46 of 50
Gwyneth Paltrow
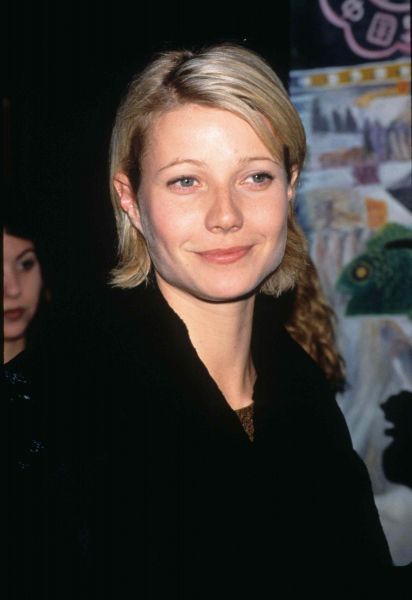
Yes, this might be the kind of post you’d see on the @90sanxiety Instagram account, but we also love the hair inspo Gwyneth is giving here. With a chin-grazing length and flipped-out ends, it’s the ultimate vintage throwback.
47 of 50
Shailene Woodley
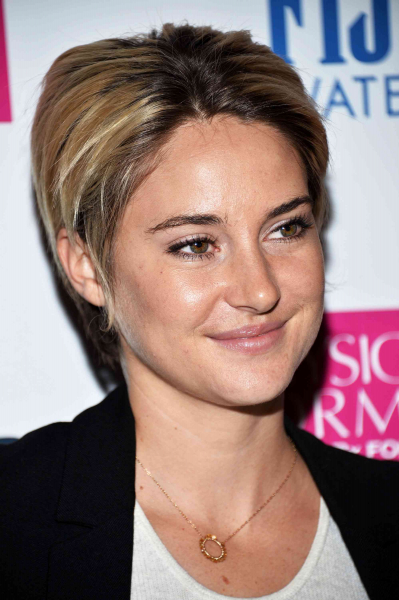
Shailene Woodley's pixie cut plays around with style and color. Emphasize your high- and lowlights with a dimensional, layered cut like this one. Tousle it, pull it up, or part it on the side—either way, the length here will give you plenty of options.
48 of 50
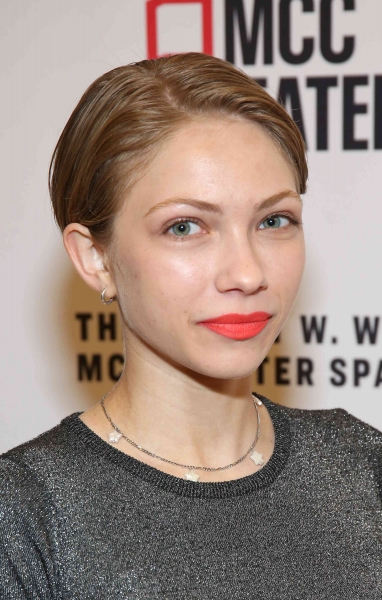
Nora Zehetner
Actress Nora Zehetner is known for effortless style, and this curly long pixie cut—complete with front ringlets—is definitely one of her best looks. If you have naturally wavy hair, use a good hairspray to play around with your bangs and manipulate the pieces around your face. With a good holding spray, you can get next-level volume, too.
49 of 50
Emma Watson
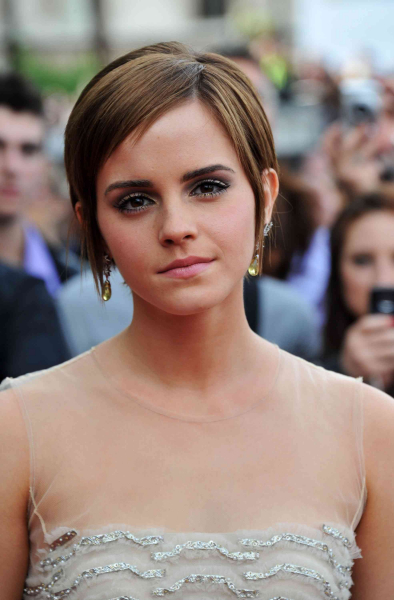
Play around with pixie cuts like Emma Watson has over the years. Her sheared side bangs paired with longer pieces on the sideburns is vintage, red-carpet Emma at her finest (if we do say so ourselves). Barely visible: a headband she slipped in for some extra-plush volume.
50 of 50
Cameron Diaz
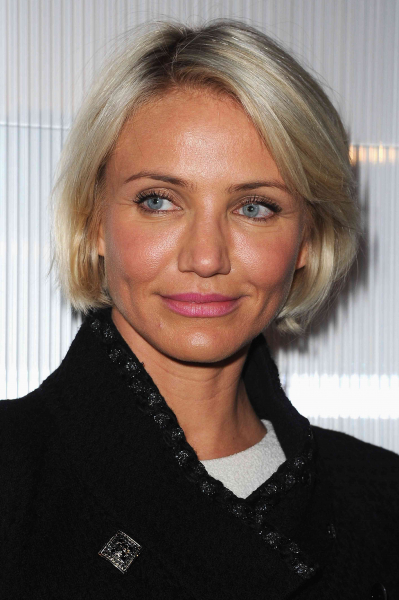
A forever blonde bombshell, Cameron Diaz can really never do wrong. But if you've been waiting for the moment to finally chop your hair off, let this be a sign: No one does a tousled blonde pixie cut better than Diaz (especially if you need it to hold up during action movie stunts and sequences).